

Microservices 101 with Node.js and RabbitMQ

Python and JavaScript Developer
Introduction
With technological advancements, the phrase "innovate or die" has become the mantra of many businesses that effortlessly update to stay relevant and keep operations running. Organizations are now designing their applications around the microservice architecture due to the ease with which each service can be built, deployed, updated, tested, and scaled independently.
Microservices have contributed to efficiency improvement, understanding of the interplay, and seamless business operations.
This tutorial will teach you about microservices and how to create a simple e-commerce microservice architecture with two services; product and order, using Node.js and RabbitMQ.
RabbitMQ is an open-source message broker. We'll learn more about RabbitMQ later in this tutorial.
In the following section, we will look at some of the prerequisites for this tutorial.
Prerequisites
The following are required to complete this tutorial:
- Node.js installed on your system.
- Sound knowledge of JavaScript and Nodejs.
- RabbitMQ installed on your system.
Microservices vs Monolithic Architecture
In a monolithic architecture, the entire application is one extensive system based on a single codebase. The server-side application logic and client-side logic are all in the same codebase.
The monolith architecture is hard to scale, ship, and deploy. A failure in a single point of the monolith would mean that the whole application will fail.
On the other hand, microservices build applications on smaller services that operate independently and in isolated logic, each service having its codebase. If one service fails in this architectural style, no significant effects are seen in the other services because they are built autonomously and operate independently.
Some of the key advantages of microservices are as follows:
- Scalability: Microservices enable cross-functional teams to update services independently. Scaling offers cost savings, improved performance, reusability, and load distribution.
- Technology mix: As technology advances, newer services built with cutting-edge technology can be introduced with less risk.
- Solidity: Unlike a monolith, the failure of a single service has no negative impact on the other services in a microservice.
- Ease of deployment: Because services have smaller codebases, deployment is simplified.
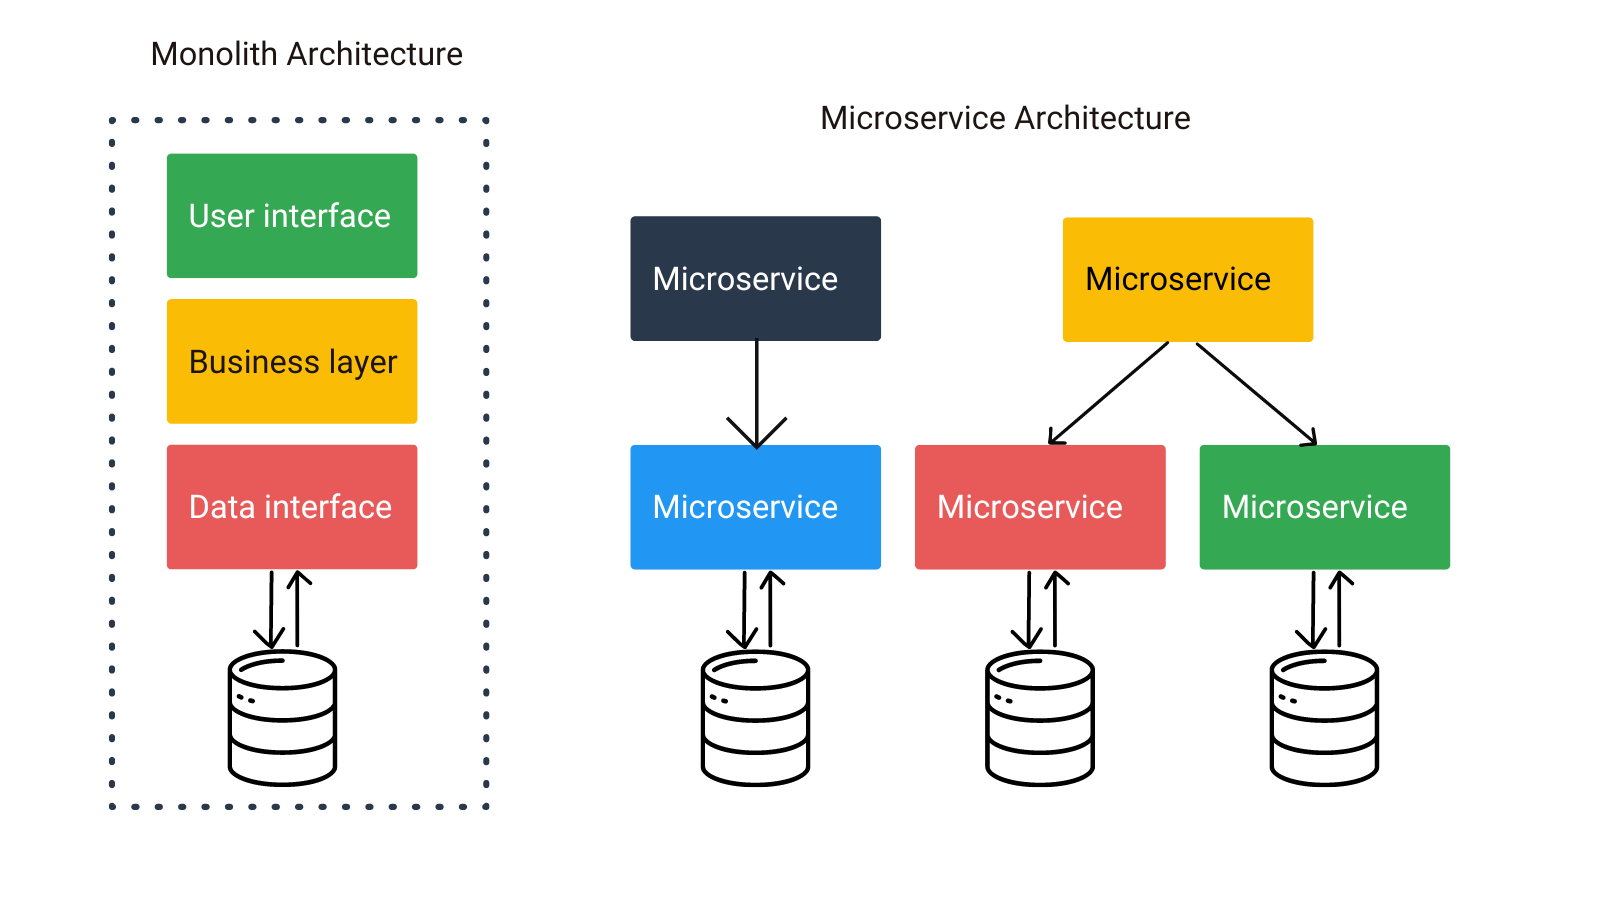 Microservices Architecture vs Monolithic Architecture
In the following section, you will learn more about RabbitMQ.
Understanding RabbitMQ
RabbitMQ is a messaging system that enables the integration of applications through messages and queues. As we previously saw, it implements the Advanced Message Queuing Protocol as a message broker (AMQP). AMQP operates by standardizing messages through producers, brokers, and consumers.
Let's take a look at how RabbitMQ works.
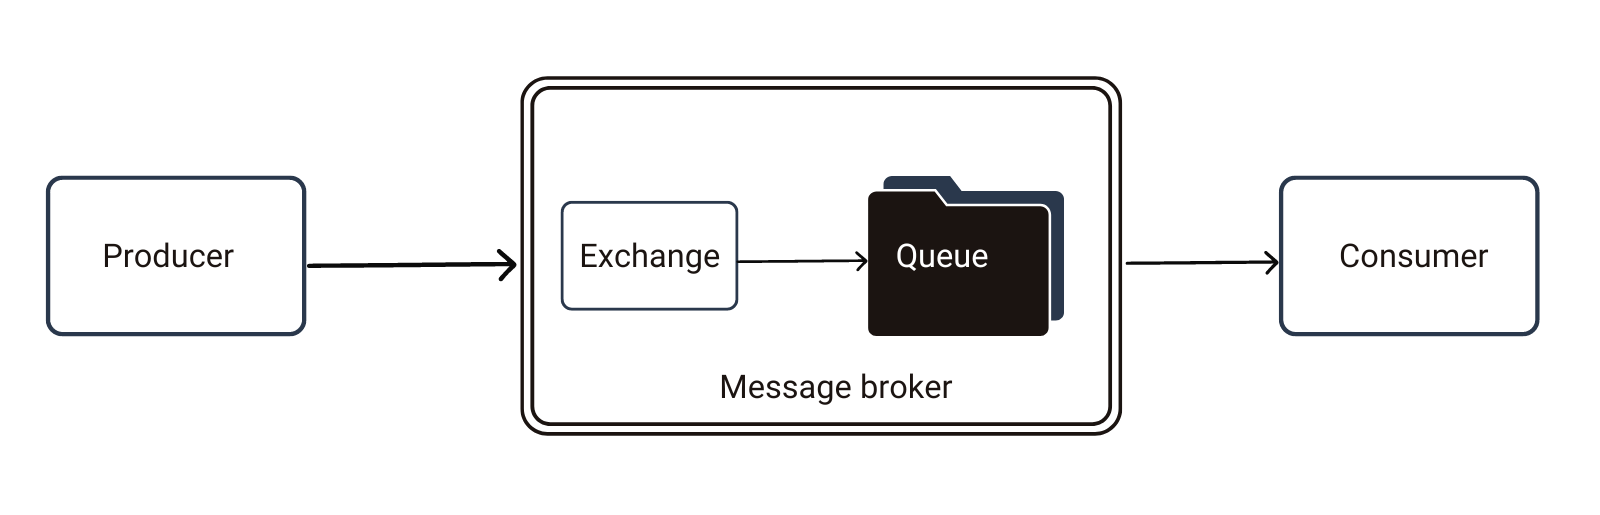
As shown above, an application publishes a message to an exchange. You can compare an exchange to your mailbox. A message broker receives the message from the client or producer, and it is then sent from the exchange to the queue using different rules known as bindings, which are protocols for routing messages to queues. The consumer then pulls the messages in the queue on the receiving end.
AMQP includes an acceptance handling mechanism. A message in the queue is kept until it receives an acknowledgment from the consumer.
In the following section, we will build a microservice app with Node.js and RabbitMQ.
Build a Simple Microservice App with Node.js & RabbitMQ
In this part of this tutorial, we will use Node.js and RabbitMQ to build a simple e-commerce microservice app. The project directory structure for our microservice app is shown below.
.
├── order-service
│   ├── index.js
│   ├── models
│   │   └── Order.js
│   ├── package.json
│   └── package-lock.json
└── product-service
    ├── index.js
    ├── models
    │   └── Product.js
    ├── package.json
    ├── package-lock.json
    └── routes
        └── product.js
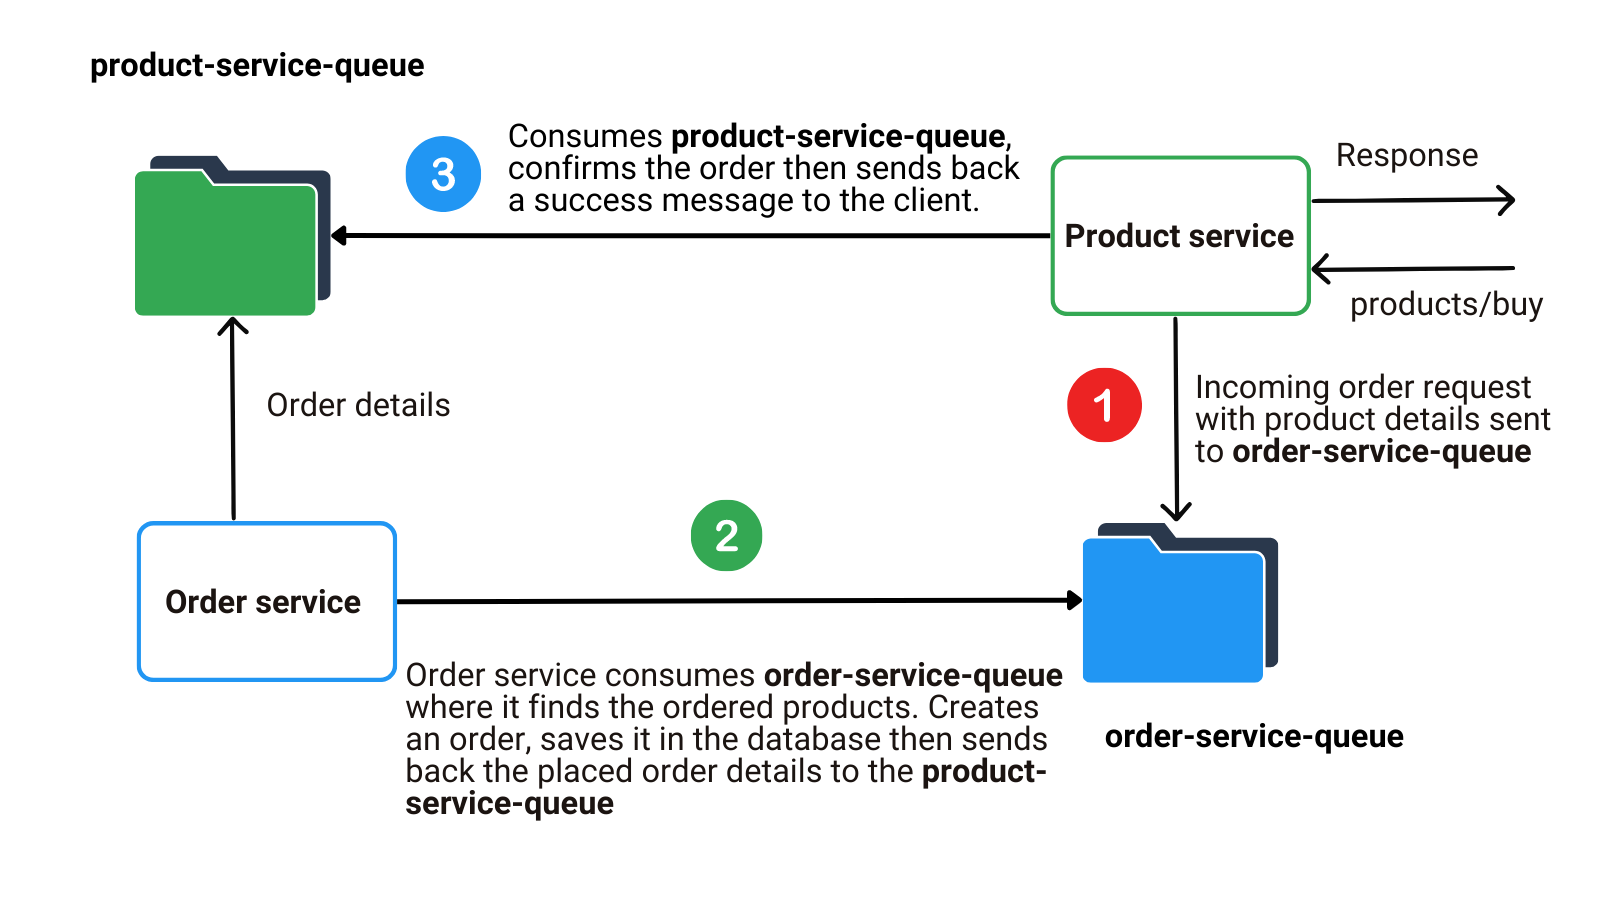
Before we start writing code, here's an example of how queuing works in the app we will build.
Product Service
To begin, create a directory inside it, make our first service, and name it product-service.
Initialize a node project
npm init -y
Install dependencies
npm install amqplib express mongoose.
Create a Product Model
Create another directory, call it models, then inside it have a file Product.js with the following code:
const mongoose = require("mongoose");
const Schema = mongoose.Schema;

const ProductSchema = new Schema(
  {
    name: {
      type: String,
      required: true,
    },
    price: {
      type: Number,
      required: true,
    },
    description: {
      type: String,
      required: true,
    },
  },
  { timestamps: true }
);

module.exports = mongoose.model("Product", ProductSchema);
We've just created a model for our products; now, let's define the routes.
Create Product Routes
Make another folder for the routes, call it routes, then inside it, have a file routes.js with the following code:
const Router = require("express").Router;
const router = new Router();
const Product = require("../models/Product");
const amqp = require("amqplib");

let order, channel, connection;

// Connect to RabbitMQ
async function connectToRabbitMQ() {
  const amqpServer = "amqp://guest:guest@localhost:5672";
  connection = await amqp.connect(amqpServer);
  channel = await connection.createChannel();
  await channel.assertQueue("product-service-queue");
}
connectToRabbitMQ();

// Create a new product
router.post("/", async (req, res) => {
  const { name, price, description } = req.body;
  if (!name || !price || !description) {
    return res.status(400).json({
      message: "Please provide name, price and description",
    });
  }
  const product = await new Product({ ...req.body });
  await product.save();
  return res.status(201).json({
    message: "Product created successfully",
    product,
  });
});

// Buy a product
router.post("/buy", async (req, res) => {
  const { productIds } = req.body;
  const products = await Product.find({ _id: { $in: productIds } });

  // Send order to RabbitMQ order queue
  channel.sendToQueue(
    "order-service-queue",
    Buffer.from(
      JSON.stringify({
        products
      })
    )
  );

  // Consume previously placed order from RabbitMQ & acknowledge the transaction
  channel.consume("product-service-queue", (data) => {
    console.log("Consumed from product-service-queue");
    order = JSON.parse(data.content);
    channel.ack(data);
  });

  // Return a success message
  return res.status(201).json({
    message: "Order placed successfully",
    order,
  });
});

module.exports = router;
Let's look at some fascinating logic from the routes we have just written.
Connection to RabbitMQ Server
In the connection logic, we first import the AMQP library as amqp:
const amqp = require("amqplib");
then connect to the RabbitMQ server
  const amqpServer = "amqp://guest:guest@localhost:5672";
  connection = await amqp.connect(amqpServer);
Next, we create a channel for sending AMQP commands to the broker:
channel = await connection.createChannel();
Lastly, assertQueue checks for the "product-service-queue" queue; if it doesn't exist, it will create one.
await channel.assertQueue("product-service-queue");
Buying a Product
To buy a product, the client sends the product id(s), stored in the request body; the server then returns the products associated with the sent ids:
  const { productIds } = req.body;
  const products = await Product.find({ _id: { $in: productIds } });
Then, these products are then sent to the order-service-queue, which we will see in a bit in the order service.
  // Send order to RabbitMQ order queue
  channel.sendToQueue(
    "order-service-queue",
    Buffer.from(
      JSON.stringify({
        products,
      })
    )
  );
A new order is created on the order service, and the order details are returned to the product-service-queue. The producer consumes from the product-service-queue in the product service, where it finds the message from the order service about the recently placed order. It acknowledges the transaction to complete the order process, and a success message is sent back to the client.
  // Consume previously placed order from RabbitMQ & acknowledge the transaction
  channel.consume("product-service-queue", (data) => {
    console.log("Consumed from product-service-queue");
    order = JSON.parse(data.content);
    channel.ack(data);
  });

  // Return a success message
  return res.status(201).json({
    message: "Order placed successfully",
    order,
  });
Set Up a Server
Finally, we create a server that acts as our application entry point for our product service. In the root of the product-service directory, create a file index.js and add the following code:
const express = require("express");
const app = express();
const PORT = process.env.PORT || 3001;
const mongoose = require("mongoose");
const productRouter = require("./routes/product");

app.use(express.json());
app.use(express.urlencoded({ extended: true }));
app.use("/products", productRouter);

mongoose
  .connect("mongodb://0.0.0.0:27017/scan-product-service", {
    useNewUrlParser: true,
    useUnifiedTopology: true,
  })
  .then(() => console.log("Product-Service Connected to MongoDB"))
  .catch((e) => console.log(e));

app.listen(PORT, () => {
  console.log(`Product-Service listening on port ${PORT}`);
});
Order Service
Create another folder, call it order-service, then repeat the node project initialization and package installation process as we had done for the product service.
Create Order Model
Make a folder models, create file Order.js, and add the following code:
const mongoose = require("mongoose");
const Schema = mongoose.Schema;

const OrderSchema = new Schema({
    products: [
      { product_id: String },
    ],
    total: {
      type: Number,
      required: true,
    },},
  { timestamps: true }
);

module.exports = mongoose.model("Order", OrderSchema);
Define the Server and Order Logic
In the root of the order-service, create a file, name it index.js, then add the following code:
const express = require("express");
const app = express();
const PORT = process.env.PORT || 3002;
const mongoose = require("mongoose");
const amqp = require("amqplib");
const Order = require("./models/Order");

app.use(express.json());
app.use(express.urlencoded({ extended: true }));
var channel, connection;

mongoose
  .connect("mongodb://0.0.0.0:27017/scan-order-service", {
    useNewUrlParser: true,
    useUnifiedTopology: true,
  })
  .then(() => console.log("Order-Service Connected to MongoDB"))
  .catch((e) => console.log(e));

// RabbitMQ connection
async function connectToRabbitMQ() {
  const amqpServer = "amqp://guest:guest@localhost:5672";
  connection = await amqp.connect(amqpServer);
  channel = await connection.createChannel();
  await channel.assertQueue("order-service-queue");
}

// Create an order
createOrder = (products) => {
  let total = 0;
  products.forEach((product) => {
    total += product.price;
  });

  const order = new Order({
    products,
    total,
  });
  order.save();
  return order;
};

connectToRabbitMQ().then(() => {
  channel.consume("order-service-queue", (data) => {
    // order service queue listens to this queue
    const { products } = JSON.parse(data.content);
    const newOrder = createOrder(products);
    channel.ack(data);
    channel.sendToQueue(
      "product-service-queue",
      Buffer.from(JSON.stringify(newOrder))
    );
  });
});

app.listen(PORT, () => {
  console.log(`Order-Service listening on port ${PORT}`);
});
When a new order request is received on the product service, the products with the specified ids are fetched and sent to the order-service-queue. On the order service, the application consumes from the 'order-service-queue,' where it finds the requested products, creates an order, and saves the details to the database.
When the transaction is completed, it acknowledges that it received the products and saved the order in the database. The order service then returns the ordered products to the product-service-queue.
connectToRabbitMQ().then(() => {
  channel.consume("order-service-queue", (data) => {
    // order service queue listens to this queue
    const { products } = JSON.parse(data.content);
    const newOrder = createOrder(products);
    channel.ack(data);
    // Send the order back to the product-service-queue
    channel.sendToQueue(
      "product-service-queue",
      Buffer.from(JSON.stringify(newOrder))
    );
  });
});
Congratulations, you now have a microservice app. Let's put it to the test. Remember, we're using RabbitMQ, so start it up with the command:
docker run -p 5672:5672 rabbitmq
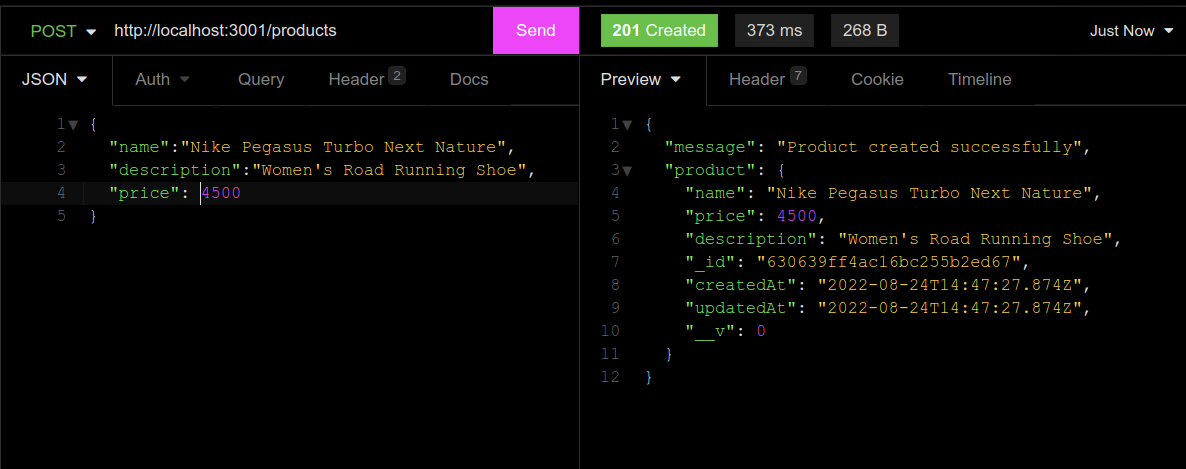
After ensuring that all services are up and running, navigate to your preferred HTTP client and create a new product.
Send a POST request to the endpoint http://localhost:3001/products along with your JSON object.
That works perfectly. Let's get your favorite person some Nike shoes.
Send a POST request to the endpoint http://localhost:3001/products/buy as shown:
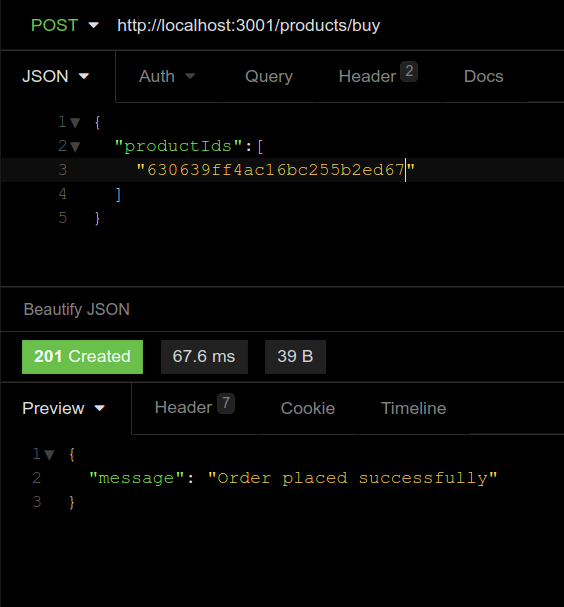 That works too!
The complete source code is available here for your reference.
Congratulations, you have completed the tutorial. How did you find it? I'm sure it's fantastic.
Conclusion
This article has taught you about the evolution of software architecture. You've learned about monolithic and microservice architectures. We also covered a step-by-step guide for creating a microservice app with Node.js and RabbitMQ. Microservices are rising, so it's time to convert that monolithic application on GitHub to a microservice. Thank you for taking the time to read this, and I hope to see you in the next one. Have a good time exploring.


