

Integration Testing With Pytest
“Untested Code Is Broken Code.”

Python and JavaScript Developer
Have you heard of "the most expensive hyphen in history"?
Imagine losing $156 million today just because of a tiny error in a computer program. The Mariner 1 incident is an example of how tragic computer program errors can be. Still, these were the early days of programming, with no error detection and code editors.
What defines this moment? Software reliability.
Software testing ensures functionality, usability, security, and performance, all of which fall under software quality, an attribute of Software reliability.
This article will teach you how to perform integration testing with Pytest, a Python testing tool that will help you write better programs. Developer, this is your guide if you've never written tests in Python. If you have, this article will help you better understand Python integration testing.
That's it; let's get started!
Prerequisites
I recommend you have the following requirements for an excellent read as you code or read, then code experience.
- A code editor of your choice, e.g., Visual Studio Code, Atom, etc
- Python 3+ installed in your environment.
- Working knowledge of any Python web framework. Flask is used in this tutorial.
- An understanding of REST APIs.
- A clone of the demo API for which we'll write tests.
- An HTTP client of your choice to try the API endpoints before testing, e.g. [Postman].(https://www.postman.com/downloads/)
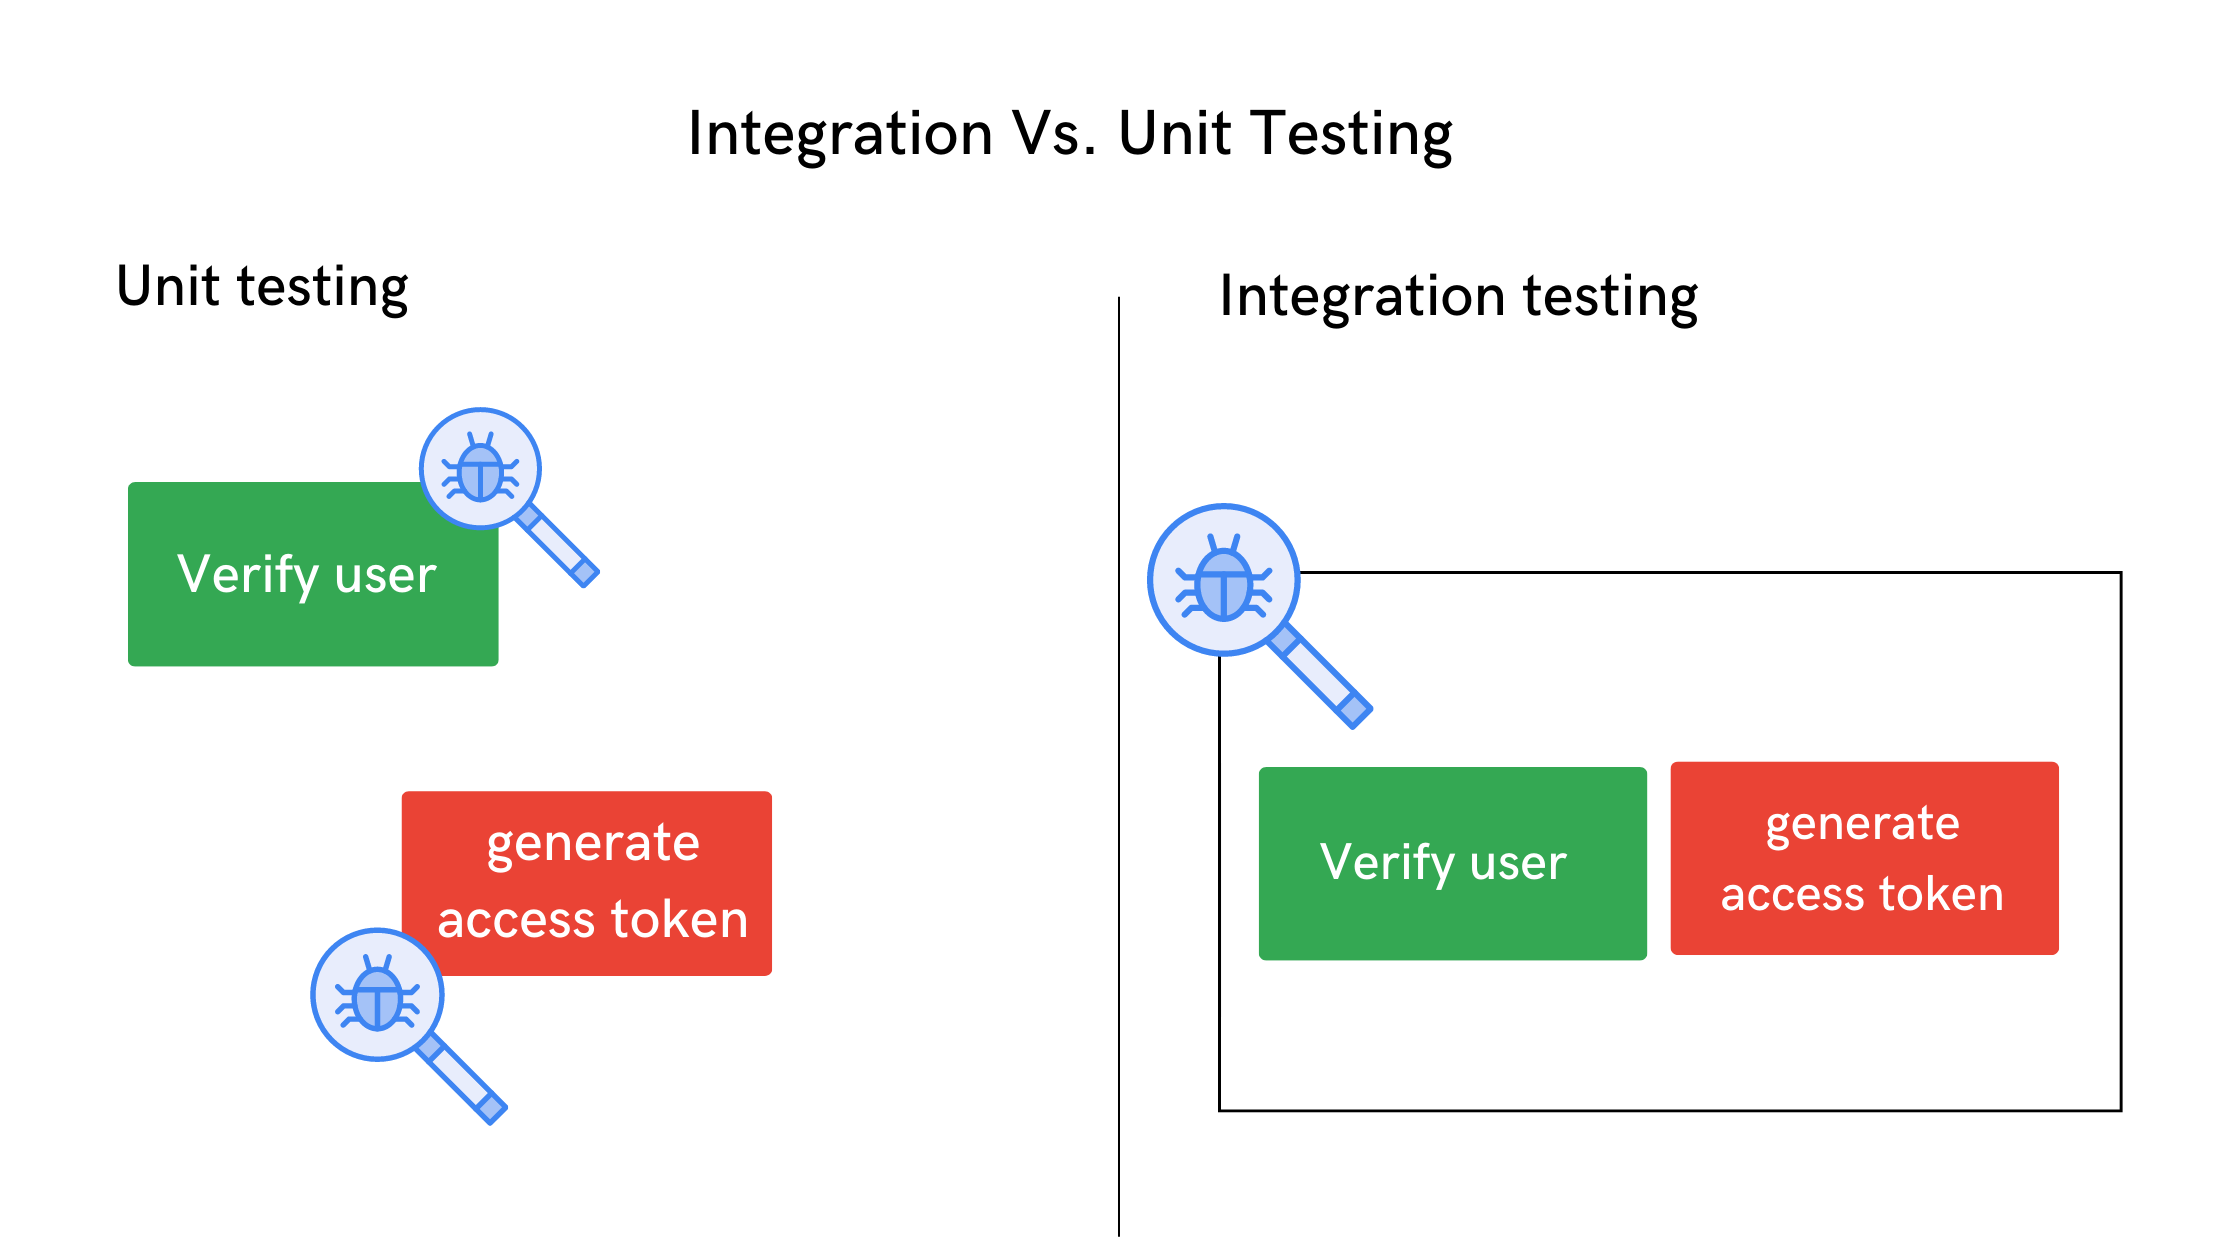
Integration Vs. Unit Testing
Unit: an individual thing or person is regarded as single and complete but can also form a particular component of a larger or more complex whole.
Source—Oxford Languages
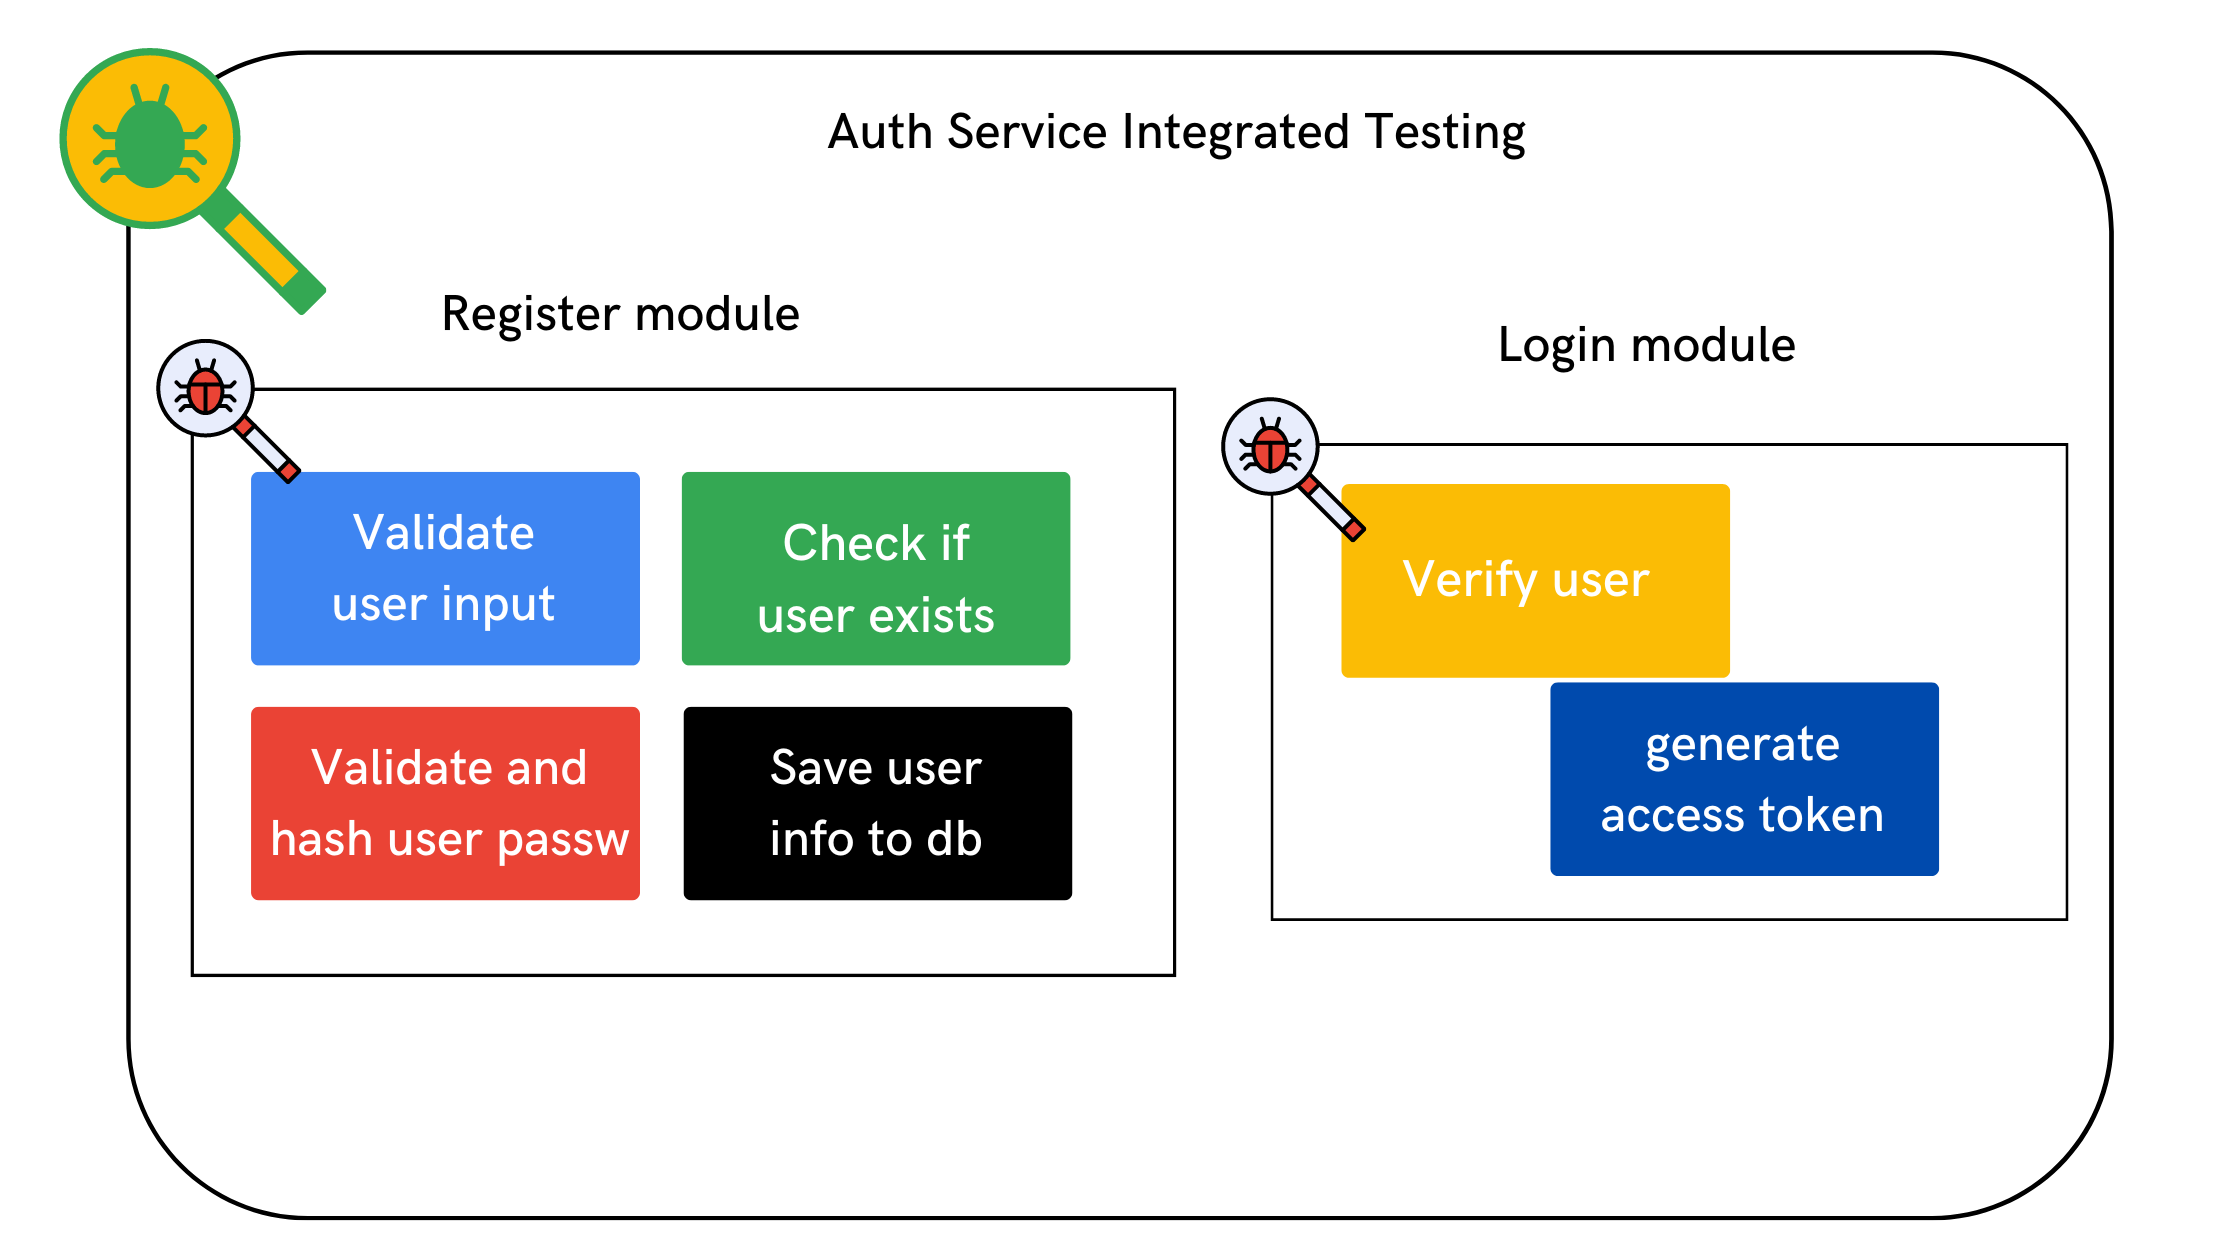
Individual units, such as function calls, are tested during unit testing. Integration testing (integrated component testing), on the other hand, combines the results of several tests. A good example is testing the process of creating a new user account on a website. In this case, several units are tested, including those that verify user data, such as email, generate a confirmation link, and confirm a user.
However, in unit testing, these methods are tested separately. Below are illustrations.

Why Do Integration Testing?
Why are your reasons for writing integration tests?
While some of your motivations may differ from mine, here are some of the reasons why developers and testers write integration tests.
- Ensures that related units/modules are correctly connected.
- There is no need for manual testing.
- Allows for simple third-party testing via live testing and mocking.
- Integration tests, as opposed to unit tests, test a more significant portion of the system and thus are more efficient.
- Errors that may occur during data flow between components are discovered.
- Integration testing is quick because it tests a collection of components.
Writing Integration Tests
In this section, you will learn how to write integration tests and some of the fascinating features that Pytest provides to make testing effortless.
Before we start writing tests, here's what we need to test:
- Creating a new user
- Obtaining all users
- Obtaining a user by id
- Modifying a user's information
- Deleting a user
The goal is now clear, so go ahead and install the app in your environment, test the API endpoints with Postman, and then join me.
Pytest at a Glance
- Installing Pytest:
Run the following command in an active virtual environment to install Pytest.
pip install pytest Test discovery: When running tests, Pytest will always look for
test_*.pyor*_test.pyfiles, and from those files, it collects:testprefixed test functions or methods outside of classtestprefixed test functions or methods insideTestprefixed test classes
Project and Test Directory Structure: Our project uses the "Tests outside the application code" layout. To learn more about the best practices, visit Good Integration Practices.
. ├── api ├── config.py ├── LICENSE ├── README.md ├── requirements.txt ├── tests │ ├── conftest.py │ ├── __init__.py │ └── test_api.py └── wsgi.py- Running tests: To run your tests, execute:
Using the command above, pytest will run all files with the extensionpytesttest_*.pyor*_test.pyin the current directory and its subdirectories. To run a specific test file, execute:pytest test_filename.py
Setting up a Test Environment in a Flask App
Why do you think we need a separate test environment from our main app?
It's simple: a test environment provides you with the essential set up to run your test cases.
In your existing Flask config.py file, activate the test flag as follows:
class TestingConfig(DevelopmentConfig):
    TESTING = True
    SQLALCHEMY_DATABASE_URI = <path_to_test_db>
Refer to the complete configuration file.
Pytest Fixtures
For modularity and scalability in tests, pytest provides fixtures.
Fixtures are functions executed before each test function to which they are applied.
Fixtures feed test data, such as database connections, URLs to test, and input data. Instead of running the same code for each test, we can attach a fixture function to the tests, which will run and return the data before each test is executed.
Source ── Tutorialspoint
Fixtures declared in the tests/conftest.py file become globally accessible to all test files in the test package, eliminating the need to import fixtures when required.
Let's deconstruct the conftest.py file.
1. Creating a Test Client
First, we need a test client that sends requests to the application without requiring a live server to run.
We create a test client within our conftest file, as shown below.
# tests/conftest.py
import pytest
import config
from api.app import db
from api.routes import app
from api.models import User


@pytest.fixture
def client():
    app.config.from_object(config.TestingConfig)
    with app.test_client() as client:
        with app.app_context():
            yield client
In the client function above, we first update the Flask app with the test configurations using app.config.from_object(), in a nutshell, telling Flask to use test configurations.
Afterward, we create a test client for our application; app.test_client() is a function that returns a Flask application configured for testing. The app_context() makes the current_app point at this test application.
The yield keyword converts the client function into a generator and returns the client to the test function.
2. Build It Up, Initialize and Tear It Down
As a best practice, always start testing with a clean database. This next fixture populates our database with test data, then builds and tears it down after tests are completed. Take a look.
#tests/conftest.py
@pytest.fixture()
def init_database():
    # Create the database and the database table
    db.create_all()

    # List of test users
    test_users = [
        {"name": "Test User 1", "email": "test1@gmail.com", "password": "12345"},
        {"name": "Test User 2", "email": "test2@gmail.com", "password": "12345"},
        {"name": "Test User 3", "email": "test3@gmail.com", "password": "12345"},
    ]

    # Convert the list of dictionaries to a list of User objects
    def create_post_model(user):
        return User(**user)

    # Create a list of User objects
    mapped_users = map(create_post_model, test_users)
    t_users = list(mapped_users)

    # Add the users to the database - add_all() is used to add multiple records
    db.session.add_all(t_users)

    # Commit the changes for the users
    db.session.commit()

    yield db  # this is where the testing happens!
    db.session.remove()  # looks like db.session.close() would work as well
    # Drop the database table
    db.drop_all()
Congratulations, we now have a test environment with the proper configurations; let us now test the endpoints.
1. Create a User Endpoint
def test_create_user(client, init_database):
    path ="api/v1/users/add"
    response =client.post(path,
     json ={
         "name":"Greg Isaac",
         "email":"doeg9@gmail.com",
         "password":"12345",
     },
    )
    assert response.status_code == 200
    assert b'{"email":"doeg9@gmail.com","id":4,"name":"Greg Isaac"}\n' in response.data
In the preceding test case, we send a POST request with sample user data to the create user endpoint. The response is then asserted to be equivalent to the data sent. This is how the API endpoint actually works. We can also verify that the status code returns a 200, indicating success.
The assert keyword is used to validate test expectations.
2. Fetch User Endpoint
def test_fetch_user(client, init_database):
    path = "api/v1/users/1"
    response = client.get(path)
    assert b'{"email":"test1@gmail.com","id":1,"name":"Test User 1"}\n' in response.data
In this case, we make a GET request with a specific user id and then verify that we get the correct data back in the response.
3. Fetch Users Endpoint
def test_fetch_users(client, init_database):
    path = "api/v1/users"
    response = client.get(path)
    assert b'[{"email":"test1@gmail.com","id":1,"name":"Test User 1"},{"email":"test2@gmail.com","id":2,"name":"Test User 2"},{"email":"test3@gmail.com","id":3,"name":"Test User 3"}]\n' in response.data
A GET request to return and assert all of the database's test users.
4. Update User Endpoint
def test_update_user(client, init_database):
    path ="api/v1/users/1/update"
    response =client.put(path,
     json ={
         "name":"hunter",
         "email":"hunterfields@gmail.com",
     })
    assert b'{"email":"hunterfields@gmail.com","id":1,"name":"hunter"}\n' in response.data
In this test case, we send a PUT request with an update of a specified user's details.
We then assert that the response contains the updated user data.
5. Delete User Endpoint
def test_delete_user(client, init_database):
    path= "api/v1/users/1/delete"
    response= client.delete(path)
    assert response.status_code == 200
    assert b'User has been deleted' in response.data
Testing the delete endpoint is also a walk in the park; all we need is to send a DELETE request
to the delete endpoint and assert that we get the right response.
That's it. We successfully wrote tests for all of the endpoints. If you set up the application, run pytest -v to see if it works.
Read more about Testing Flask Applications
Final Thoughts
I'm happy to tell you that the skills you've learned in this article are applicable across different platforms; the syntax may change, but the concept remains the same.
You've learned what integration tests are, how they differ from unit tests, and how, according to the Mariner 1 story, if they had tests at the time, they could have detected the missing overbar early on. As a result, testing is as important as any other development phase.
You've also learned how to set up a test environment, why you need one, and how to write tests. If you haven't already written any tests, now is the time. Please leave a comment if you enjoyed this article.
See you in the next article, and in the meantime, keep learning.


