

Mastering Node.JS and GraphQL: Tips and Tricks for Beginners

Python and JavaScript Developer
The internet has come a long way since the early days of the world wide web. What was popular yesterday may be replaced by something new tomorrow. We've gone from static pages to dynamic applications that can do everything from ordering a pizza to hailing a ride. And behind all of these applications is a set of APIs allowing different software components to communicate.
GraphQL is a relatively new API technology quickly gaining popularity due to its performance and flexibility. While Node.js, a JavaScript runtime well-suited for building fast and scalable applications, has continued to dominate the web.
This article will teach you how to get started with Node.js and GraphQL. By the end of this article, you should have a good understanding of how to use Node.js and GraphQL and be able to start building applications with these technologies.
Let’s get started!
Prerequisites
To follow along, you need to have the following:
Familiarity with JavaScript
Node.js installed on your system
Basic knowledge of Node.js
GraphQL Extension (for VsCode)
In the next section, we will learn about Node.js, GraphQL, and why you should use GraphQL in your next project.
What is GraphQL?
GraphQL is a query language for your API and a server-side runtime for executing queries using a type system you define for your data. GraphQL isn't tied to any specific database or storage engine but is backed by your existing code and data.
Why Should We Care About GraphQL?
There are several reasons why you might want to use GraphQL:
- To fetch data from multiple sources in a single request.
When retrieving data from various sources, GraphQL can make a single request to retrieve all of the information required. Making multiple requests to different sources becomes more efficient.
- To avoid over-fetching or under-fetching data.
GraphQL can optimize data fetching by allowing the client to request only the needed data preventing the client from fetching too much information (over-fetching) or too little data (under-fetching).
- To reduce the number of round trips to the server.
You can specify what data you require when requesting a GraphQL API. To mean that the server only needs to make one trip to fulfill the request rather than multiple trips to retrieve all possible data types. This becomes a significant benefit when dealing with large or complex data sets.
- To make your API more predictable and easier to debug.
GraphQL allows you to request specific data from your API, and the response will only contain the requested data. This makes it easier to debug your API because you can more easily predict what data is returned.
If you're building a modern web or mobile app, chances are that you will need an API. And if you're looking for a better way to build APIs, GraphQL is worth checking out.
Understanding GraphQL
The schema, queries, and resolvers are the three primary building blocks of GraphQL.
Queries and Mutations
Query
A Query in GraphQL is a request for data from a server. The request is made in the form of a query string, a string of text that contains the query. The query is then sent to the server, which parses the query and returns the data.
Here is an example of a query in GraphQL:
query {
 user(id: 1) {
   name
   email
 }
}
The query above is a basic example of GraphQL retrieving data. Here, the query requests the name and email of the user object with an ID of 1. The query is composed of a few key components: the query keyword, the user object, the id parameter, and the fields name and email.
The query keyword is used to define the type of query we are making. In this case, we are making a simple query that fetches data from the user object.
The user object is the name of the object we are fetching data from. In this case, we are fetching data from the user object.
The id parameter is a unique identifier for the user object we want to retrieve data from. In this query, we are requesting data for the user with an ID of 1.
Finally, the fields name and email are the specific data we want to retrieve from the user object. In this case, we want to retrieve the name and email of the user.
Mutation
A mutation is a GraphQL operation that changes data on the server. Mutations can create, update, or delete data.
For example, the following mutation would create a new user with the name "John":
mutation {
 createUser(name: "John") {
   id
   name
 }
}
Schema
The schema is a collection of type definitions that describe the structure of the data in a GraphQL API.
Type Definitions
A type definition in GraphQL defines the data structure that can be queried from a GraphQL server. In the following example, we define a type called User, which has fields for id, name, and email:
 type User {
   id: ID
   name: String
   email: String
 }
Basic Types
Six types are supported in GraphQL:
Scalars: A scalar type represents a single value and can be one of the following:
- Int: A 32-bit integer.
- Float: A double-precision floating-point number.
- String: A UTF-8 encoded character sequence.
- Boolean: true or false.
- ID: The ID type is used to represent a unique ID.
Object: An object type represents a set of fields, each with a name and a type. Objects can have one or more fields, and fields can be of any type, including other objects.
Input: An input type represents a set of values passed into a field. Input types can have one or more fields, and fields can be of any type, including other input types.
Enum: An enum type represents a set of predefined values. Enum types can have one or more values, which can be of any type, including other enum types.
Union: A union type represents a set of types that can be used in place of a single type. Union types can have one or more members, and members can be of any type, including other union types.
Interface: An interface type represents a set of fields that other types can implement. Interface types can have one or more fields, and fields can be of any type, including other interface types.
Resolvers
A resolver is a function responsible for fetching the data for a specific field in a GraphQL schema. In the following example, the user resolver is responsible for fetching the data for the user field in the Query type:
Query: {
   user: (parent, { id }, { db }) => db.users.get(id),
 }
GraphQL Vs. REST
GraphQL is based on a simple idea: instead of having multiple endpoints that return fixed data structures, you should just have one endpoint that returns a dynamic data structure. This data structure is determined by a query you send to the server.
For example, let's say you have a REST API with an endpoint for retrieving a list of users. This endpoint might return a JSON object like this:
[{
       "id": 1,
       "name": "John Doe"
   },
   {
       "id": 2,
       "name": "Jane Smith"
 }]
Now let's say you want to add an endpoint that returns a single user. With REST, you would add a new endpoint, /users/:id, that returns a JSON object like this:
{
 "id": 1,
 "name": "John Doe"
}
With GraphQL, you would simply add a new field to the existing /users endpoint. This field would take an id argument and return the corresponding user object:
users {
 id
 name
}
Now, if you want to add a new endpoint that returns a list of users' posts, you can simply add a new field to the /users endpoint:
users {
 id
 name
 posts {
   id
   title
   body
 }
}
As you can see, GraphQL is much more flexible than REST. With GraphQL, you can make a single request and get back precisely the data you need. You don't need to make multiple requests and combine the data yourself.
Are you excited to see GraphQL in action with Node.js?
Setting Up a Node.js and GraphQL Server
This section will cover setting up a GraphQL server using Node.js.
Step 1: Initialize a Node.js Project
First, you'll need to create a directory and initialize a Node.js project using the command:
npm init
Step 2: Install Dependencies
Next, install the necessary dependencies. To run a GraphQL server, you need the libraries listed below and the graphql package.
Apollo Server: a server that helps you build GraphQL applications. It provides tools that make it easy to build GraphQL applications.
Nodemon: a utility that automatically restarts a Node.js application when the application's files are changed.
You can install these using npm:
npm install apollo-server graphql nodemon
Step 3: Create a Server
Once the dependencies are installed, create a new folder called src; within the src folder, create a new file called server.js.
Add the following code to server.js:
src/server.js
// Server.js - This file is the initial starting point for the Node/Express server.
const { ApolloServer, gql } = require("apollo-server");


const typeDefs = gql`
 type Query {
   hello: String
 }
`;


const resolvers = {
 Query: {
   hello: () => "I'm a GraphQL server!",
 },
};


const server = new ApolloServer({
 typeDefs,
 resolvers,
});


server.listen().then(({ url }) => {
 console.log(`🚀 Server ready at ${url}`);
});
The code above defines a simple GraphQL schema with one type and one field. The schema defines a Query type with a single hello field. The hello field resolves to a String type.
The code then defines a resolver for the Query type. The resolver returns the string "I'm a GraphQL server!" when the hello field is queried.
Finally, the code creates an ApolloServer instance and passes in the schema and resolver. The ApolloServer instance starts a new GraphQL server. URL is the endpoint for the GraphQL server; we get this from the server.listen() method.
Step 4: How to Modify package.json
To use nodemon, you need to modify your package.json file. Add the following line to the "scripts" section:
"start": "nodemon src/server.js"
This will tell nodemon to start your server.js file when you run the npm start command.
Step 5: Start the Server
To start the server, you will need to open a terminal in your current project directory and run the following command:
npm start
This will start the server and make it available at http://localhost:4000/.
Step 6: How to Query Your Server
When you're ready to start querying your server, GraphQL provides a Playground that lets you do just that. The Playground is a graphical, interactive way to test your GraphQL queries and see the results.
To proceed to the playground, on your browser at http://localhost:4000/, click Query your server.
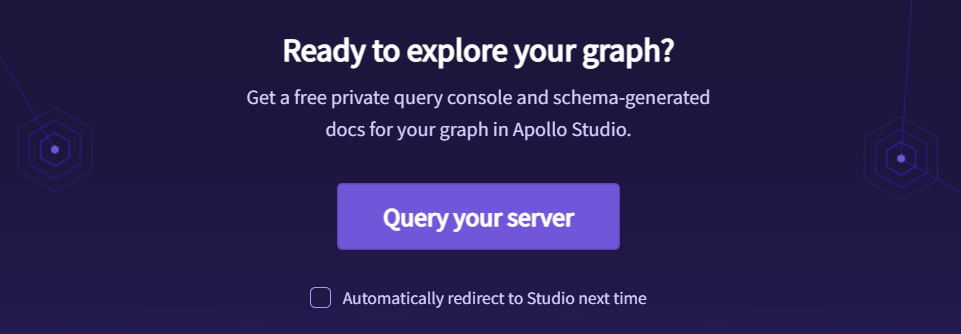
So let’s go ahead and give it a try!
Once in the Playground, you can write your GraphQL queries and mutations in the left-hand editor pane. You can then execute those queries and mutations by clicking the "play" button in the top-right corner of the pane.
The results of your queries and mutations will be displayed in the right-hand pane. You can also view your schema in this pane by clicking the "schema" button in the top-left corner.
Here's a simple example query to use:
query ExampleQuery {
 hello
}
The example query above asks for the hello field from the server.
The results from the server would look like this:
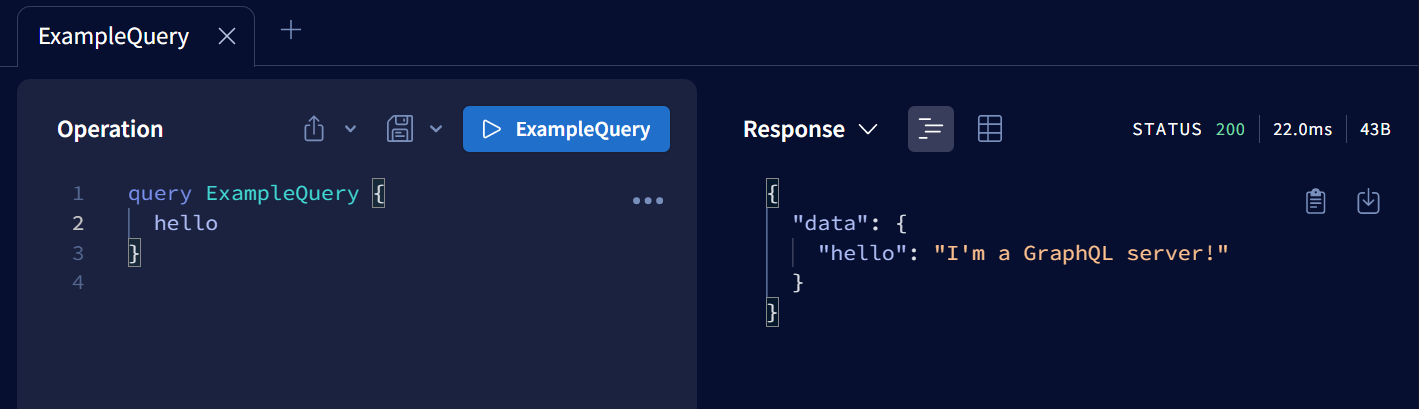
You've successfully set up a GraphQL server and run a query! Congratulations!
In the following section, you will learn how to build a full-fledged GraphQL and Node.js application.
Node.js and GraphQL in Action
This section will teach you how to build a complete events GraphQL and Node.js application. To simulate a real database, we'll store data in in-memory storage.
Let's get this ball rolling.
Here is what the project structure will look like.
.
├── package.json
├── package-lock.json
├── README.md
└── src
    ├── data
    │   └── db.js
    ├── resolvers
    │   ├── Mutation.js
    │   └── Query.js
    ├── schemas
    │   └── Schema.js
    └── server.js
Step 7: Building a GraphQL Schema
To build a schema, you must first define the types you want to use. For each type, you need to specify the fields it has and the types of data that those fields contain. Once you have defined all your types, you can put them into a schema.
Insert the schema below into your Schema.js file.
src/schemas/Schema.js
const { gql } = require("apollo-server");

// Let's define the schema for our events
exports.typeDefs = gql`
   type Event {
       id: ID!
       title: String!
       description: String!
       date: String!
       time: String!
       location: String!
       organizers: [String!]!
       venue: String!
   }
   type Query {
       events: [Event!]!
       event(id: ID!): Event!
   }

   type Mutation {
   createEvent(input: addEventInput!): Event!
   updateEvent(id: ID!, input: updateEventInput!): Event!
   deleteEvent(id: ID!): Boolean!
   }

   input addEventInput {
       title: String!
       description: String!
       date: String!
       time: String!
       location: String!
       organizers: [String!]!
       venue: String!
   }

   input updateEventInput {
       title: String
       description: String
       date: String
       time: String
       location: String
       venue: String
   }
`;
This schema defines the types; Event, Query, and Mutation. The Event type has fields for id, title, description, date, time, location, organizers, and venue. The Query type has fields for events and event.
The Mutation type has fields for createEvent, updateEvent, and deleteEvent.
type Query {
    events: [Event!]!
    event(id: ID!): Event!
}
The Query type is the root type of every GraphQL schema. It defines the entry points into the schema. The events field is an array of Event objects which can't be null. The event field is a single Event object identified by its id.
The "!" after a field in GraphQL indicates that the field is required.

The above illustration defines a GraphQL mutation. The createEvent mutation takes an input of type addEventInput, which is used to create a new event. The updateEvent mutation takes an input of type updateEventInput, which is used to update an existing event. The deleteEvent mutation takes an input of type ID, which is used to delete an event.
Step 8: Defining Resolvers
Let's create two resolvers, one for mutations and one for queries.
Mutations
Insert the following code into src/resolvers/Mutation.js.
src/resolvers/Mutation.js
const { v4: uuidv4 } = require("uuid");


exports.Mutation = {
   createEvent: (parent, { input }, { db }) => {
       const id = uuidv4();
       const event = {
           id,
           ...input
       };
       db.events.push(event);
       return event;
   },
   // Update Event
   updateEvent: (parent, { id, input }, { db }) => {
       const eventIndex = db.events.findIndex((event) => event.id === id);
       if (eventIndex === -1) return false;
       db.events[eventIndex] = {
           ...db.events[eventIndex],
           ...input,
       };
       return db.events[eventIndex];
   },
   // Delete Event
   deleteEvent: (parent, { id }, { db }) => {
       const eventIndex = db.events.findIndex((event) => event.id === id);
       if (eventIndex === -1) return false;
       db.events = db.events.filter((event) => event.id !== id);
       return true;
   },
};
This resolver creates, updates, and deletes events in the database. It uses the uuidv4 function to generate a unique id for each event.
The createEvent mutation takes three arguments: parent, input, and db. The parent argument refers to the parent object that the mutation is being performed. The input argument is the data that is being passed into the mutation. The db argument is the context object that contains the database information.
Queries
Add the following to the Query.js resolver.
src/resolvers/Query.js
exports.Query = {
   events: (parent, args, { db }) => db.events,
   event: (parent, { id }, { db }) => db.events.find(event => event.id === id),
};
The resolver above returns all events in the database or a single event if an id is provided.
Step 9: Adding Dummy Data
Let’s add some dummy data to test the application.
Add the following to src/data/db.js.
src/data/db.js
const events = [
   {
       id: "1",
       title: "DevFest Nairobi 2022",
       description:
           "DevFest is a community-led, developer event hosted by GDG Nairobi. It is a day of learning, sharing, and connecting with other developers in the community.",
       date: "2022-01-01",
       time: "10:00",
       location: "Nairobi, Kenya",
       venue: "United States International University, Africa",
   },
   {
       id: "2",
       title: "GitHub Universe",
       description:
           "GitHub Universe is a conference for developers, by developers. Join us for two days of learning, inspiration, and community.",
       date: "2023-01-01",
       time: "10:00",
       location: "San Francisco, CA",
       venue: "Moscone Center",
   },
];


exports.db = {
   events
};
Step 10: How to Modify Server.js
Modify src/server.js file to look like this:
const { ApolloServer } = require("apollo-server");
const { typeDefs } = require("./schemas/Schema");
const { Query } = require("./resolvers/Query");
const { Mutation } = require("./resolvers/Mutation");
const { db } = require("./data/db");


// Create the ApolloServer
const server = new ApolloServer({
   typeDefs,
   resolvers: {
       Query,
       Mutation,
   },
   context: {
       db,
   },
});


server.listen().then(({ url }) => {
   console.log(`Server is running on ${url}`);
});
This code creates a new instance of the ApolloServer class. The ApolloServer class takes an object with the type definitions for the server, resolvers, and context.
The context object will be passed to all resolvers. This can be used to store information that should be accessible to all resolvers, such as a database connection.
That’s it!
I've prepared the queries and mutations you'll need to test the application quickly. The GitHub repository can be found here.
Final Thoughts
Node.js and GraphQL are two powerful technologies that can help developers create efficient and scalable web applications. By following the steps outlined in this article, you can start building your own GraphQL API using Node.js and integrate it into your existing application or build a new one from scratch. With its intuitive syntax and flexible architecture, GraphQL can make querying data a breeze, while Node.js provides a solid foundation for building fast and scalable server-side applications.
So whether you're a beginner or an experienced developer, it's never been easier to get started with Node.js and GraphQL and take your web development skills to the next level. Happy coding!


